Your basket is currently empty!
Fibre optics in plasterboard
Whether your project is 20 square metres in Durham or 200 square metres in Dubai,
our ready-to-install plasterboards are sure to impress.
We can supply pre-fibred taper edge panels all ready to fit.
Each will utilise our optical jointing system with each board having one or more 2.5 metre long “plasterboard tails”, complete with jointing ferrule.
Carrier or feeder tails which bring light from the light source are run out to each panel location and the ferrule at the end
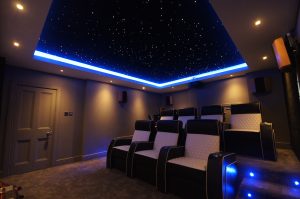
Two Infinity plasterboard tails (bundles of fibre) per panel give us a nice star density of 69 per square meter. The tails use the same mix of 4 different diameters of fibre to create a natural near and far effect. Our staff create the fantastic star fields which can be seen below with the lights dimmed.
DIY plasterboard panels
If you prefer to fit the fibres to the plasterboard yourself, we can supply you with the plasterboard tails, feeder tails and other components.
For a full size board (2400 x 1200mm) one tail will be approx. 35 stars per square metre, two tails 70/m2 and so on.
For each plasterboard tail you’ll need a corresponding feeder tail of a suitable length.
You’ll also need the Hydra – the interface between the feeder tail and the light source. Each Hydra can accommodate up to 6 tails.
The Hydra plugs into the optical port of the light source and if you’re using our MiniLED600 or MiniLED850 light sources, which have twin LEDs, you could have two Hydras (12 tails) per light source.
The light source is positioned as close to the display as is practical and the carrier tails run out to each board.
If you are over boarding an existing ceiling then leave gaps, or drill holes in the battens/C Stud to allow passage of the tails.
Light will be distributed to the panels via our Hydra system.
As each panel is offered into position its panel tail(s) are connected to the carrier tail(s) in a simple push-fit action.
This system allows for a division of labour – as one person is fitting fibres to plasterboard another can be pre-positioning the carrier tails at ceiling level.
Some things to consider:
We use taper edge boards since putting a traditional skim of plaster over fibres is extremely difficult and time-consuming, and the results can be very variable.
Using the taper edge boards you will need to populate recessed taper joints with stars so as not to create tramlines of empty space.
However, you will only need four or five stars per linear metre of joint. In other words don’t put lots of clusters in the joints. It will just make it harder to fill and sand.
How To Join Pre-fibred Plasterboards
Fill the seam with jointing compound, sand and then repeat. If you can get a good finish with two fillings and sandings leave it at that.
If not, repeat. During the filling and sanding process most of the fibres will snap off close to the surface. Don’t worry, this is part of the process.
Once you have a good smooth finish several coats of paint will be needed to cover the bare plasterboard.
PMMA fibre naturally repels water-based paints so most of your star points will be largely unaffected.
However, one or two fibres may snap just under the surface and the paint will fill the indent and dim the fibre.
You have a couple of choices here.
1 The night sky is full of dim stars so don’t worry about them
2) Use a craft knife blade or similar to gently reveal the dim fibres.
If you have any questions at all regarding a plasterboard star ceiling give David or Martin a call on 01289 332900
or, if you prefer, email: info@starscape.co.uk.
Because plasterboard is fragile we will only deliver the boards palletised. For non-commercial customers that don’t have pallet handling capabilities,
please ensure you have enough people available to offload the boards from the delivery vehicle.
Contact our friendly team to discuss your project – no matter how large or small.

Get in touch
- 01289 332900
- info@starscape.co.uk
